 
|
|
|
Management of a group, once it has been created, is the responsibility of the designated Group Administrator. The group administrator is a special role within a group and gives that user elevated rights within that particular group. The Group Administrator can be the same person as the PayGate Desktop administrator but is usually not.
The Group Administrator role is part of the security of PayGate. It allows a nominated user to be able to manage the sensitive security aspects of payments – without having the elevated privileges of the overall administrator.
You manage a group by navigating to the ‘Manage a PayGate Desktop Group’ page. Using the Menu choose: Admin > Manage Groups page. The page will display a list of all the groups that you a Group Administrator of and therefore have responsibility over. Choose the group you want to configure my clicking the ‘Configure’ link next to the group name.
Note: If you do not see the group listed that check that you are the actual group administrator. Only groups were you are the group administrator will be shown.
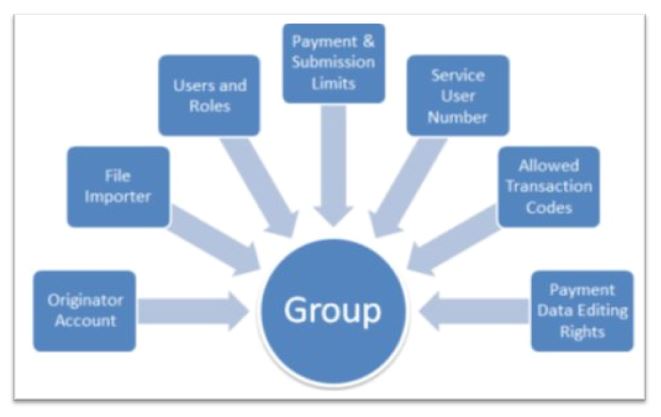
Name
When your users come to create payments they will choose a group from a list of available groups. To ensure they select the correct group you should name your new group with a short and descriptive name. Don’t use ambiguous names such as ‘Group 1’, ‘Group 2’, etc or you users may not know which group to choose and could select the wrong group. The group name is limited to a maximum of 18 characters.
Description
This is an optional field that can be used to supply extra group information to your users. The group description can be a maximum of 999 characters.
File Importer
The File Importer determines the format of the files that your users will import into PayGate as part of a bulk payment submission. PayGate Desktop is able to read files in many different formats. The file importer you choose must match the format of the files that you wish to import in the group.
File importers are created elsewhere in the system. See this section for more information.
Originator Account
The originator account is the originating or source bank account that payments within a group will use. The account must be a valid UK domestic bank account with a six digit sorting code and an eight digit account number. If you have an account number that is more or less than eight digits that it must be transposed into an eight digit version before it can be used. Contact your bank for details of how to transpose your non-standard account number.
Originating bank accounts are created elsewhere in the system. See this section for more information.
Group Roles
In this section you add users to your group and then assign individual roles to those users. Using this methodology you can ensure that only particular users can make payments on a particular group and that only selected uses can carry out sensitive roles such as approving a partment.
The different roles within a group are as
follows:
Role
Group Admin
The user that is able to manage the configuration and users
within a group.
Create
The user that creates a new payment submission bu either
importing a bulk payment file or my manually keying in payment
data.
Sign
The user that digitally signs a payment submission using a bank
issued smart card.
Approve
The user that approves a signed submission for processing.
A payment submission will not be able to continue until it is
approved.
Submit
The user that transmits an approved payment submission to BACS
or Faster Payments
Collect Reports
The user that collects (and views) BACS and Faster Payments
reports from the BACS service.
Adding users to a group
A group starts out with only one user. This is the Group Administrator that was created when the group was first created.
In a single user environment you will want to assign all of the roles to one user. In a multi-user environment you can assign roles to different users depending on their role within the organisation.
To add a new user to a group select their username form the drop-down list and click ‘Add User to Group’. The user is now a member of the group but has not yet been assigned any role. To assign roles simply tick the appropriate role boxes next to their name and save your new configuration by clicking ‘Update Group’ at the bottom of the page.
Removing a User from a Group.
You can
remove a user from a group at any time. Removing a user from a group will
also remove all of their roles within a group.
In the list of users
under ‘Group Roles’, click the button marked ‘x’ next to the username of the
user you want to remove. The user and their roles will be removed
from this group.
Individual Payment Limit
This is the maximum amount an individual payment item can be within a bulk payment submission using this group. PayGate Desktop will enforce this limit and will not allow the submission to proceed if the limit is exceeded.
The default value is 0 which means there is no limit in force.
Since this limit is set at the group level, all member users of the group are restricted by this value equally.
Submission Limit
The submission limit enforces a maximum submission amount for the group. The maximum submission amount is the aggregate value of all credits in the submission. PayGate Desktop will enforce this limit and will not allow the submission to proceed if the limit is exceeded.
The default value is 0 which means there is no limit in force.
Since this limit is set at the group level, all member users of the group are restricted by this value equally.
Service User Number (SUN)
This is the BACS Service User Number that the group will use when preparing your BACS or Faster Payment submission files. It is also used when collecting BACS reports to ensure the correct reports are returned from BACS.
The value set here will always override any SUN's found in imported files. For example, if you import a Standard18 file into PayGate Desktop then any SUN found in that imported file will be overridden with the value set here.
PayGate Desktop only supports direct submitter SUNs and does not support Bureau or indirect submission SUNs.
Payment Data Editing
When ticked users in the ‘Create’ role when creating a new submission can edit the imported payment data. This is often used to allow a user to correct the imported data without having to regenerate the imported file.
Note : Be aware, users that can edit payment data will be able to change amounts and bank account details.
Users can delete payments - When ticked users with the ‘Create’ role can remove individual payment instruction from an imported file during the creation of a new payment submission.
Advanced
Some features are hidden away to avoid accidental usage. Click ‘Advanced’ to open the advanced features panel.
Delete Group.
Will delete the group from the system. All settings will be permanently lost and will not be recoverable – even by paygate staff.
Allowed Transaction Codes
Determines the transaction codes that are allowed in a group. You can use these settings to restrict the use of certain transaction codes within the group. For example, in a group that is used for submitting Direct Debits or AUDDIS information, you can restrict the use of credits (Transaction code 99) from being used.
Unless a transaction code is ticked. PayGate Desktop will stop any transaction that uses a particular code.
|
©Copyright 2016 Ultra Electronics Limited . |